
.jpg "Amanda Ringler")
Are you dealing with drafty outlets and walls that are cold to the touch?
You probably have little to no insulation in your walls and you’re ready to do something about it with foam insulation. With traditional insulation, you would have to tear down the drywall in most cases to remedy the situation, but that’s not the case with injection foam insulation.
Now that you know you won’t have to do a total remodel project to take control of your home’s comfort, let’s talk about the process of insulating exterior walls.
RetroFoam of Michigan has more than 17 years of experience insulating exterior walls in existing homes across the Mitten. With this experience comes our ability to insulate your exterior walls and leave your home not only more comfortable but also looking like we were never there.
We are on a mission to educate homeowners, and for this article that means explaining the injection foam insulation installation process for homes with different siding types.
Get your questions answered about insulating your existing home with foam.

How to Insulate a House with Existing Walls
Our process of adding insulation to existing walls is quick, simple, and in most cases can be done in just one day.
The type of siding you have can change the installation process by varying degrees from the technique used to the amount of time it takes to complete the job.
Let's take a look at each siding material and what that installation looks like.
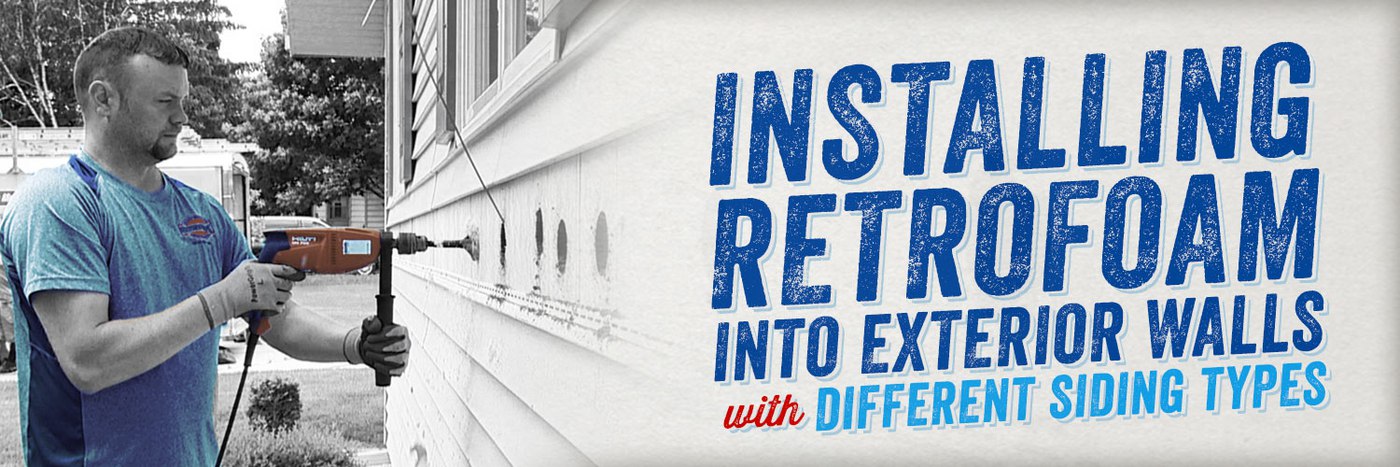
Adding Insulation to Existing Walls with Vinyl and Aluminum Siding
 The process of insulating homes with vinyl and aluminum siding is fairly similar.
A piece of siding is removed, and a 2 ½-inch hole is drilled into each stud cavity. A crew member then runs a Slim Jim up and down the cavity. This is done to ensure there are no fire stops or studs that will prohibit the hose from getting all the way to the top and to feel for the next stud. This gives the installer a good idea of what is in the cavity from top to bottom and side to side.
The installer will then run the injection hose all the way to the top of the cavity and all the way to the bottom while injecting the foam. If the installer runs into any obstructions or blockages, another hole will be drilled either above or below it and more foam will be injected to ensure the cavity is completely filled.
Once the foam has been injected and the cavity is filled, the holes are then plugged, and the siding is replaced.
The crew then cleans up to ensure everything looks the way it did before they arrived.
Adding Foam Insulation to Existing Walls with Slate Tile Siding
Homes that have slate tiles are similar to vinyl or aluminum siding. The tiles are removed, holes are drilled into the cavity, the foam is injected, then the holes are plugged, and the siding is replaced.
Adding Foam Insulation to Existing Brick Walls
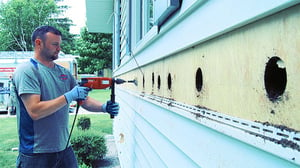
 Working with brick siding tends to take a little more time than vinyl and aluminum because crews must drill a 5/8-inch hole into the mortar to reach the wall cavity.
The holes are drilled at the top, middle, and bottom of the cavity. After the holes are drilled, the foreman will inject the foam beginning at the top, moving to the middle, and finishing at the bottom.
Once the foam is injected, a crew member will clean up the dust and chunks. Those new holes in the mortar need to be filled, and a good contractor will make the mortar on-site to fill them.
A third crew member will follow along behind the installer to fill the holes drilled with the mixed mortar. This person should not just patch the outside of the brick and mortar, but instead inject the mortar into the drilled holes, filling the entire space, and smoothing the area over.
Insulating Exterior Walls in Existing Homes with Stucco Siding
Stucco is treated the same way as brick.
A 5/8-inch hole is drilled at the top, middle, and bottom of the cavity to ensure the foam insulation completely fills the space. A crew member will mix the mortar to fill the holes after the installation.
How to Insulate Exterior Walls with Wood Siding
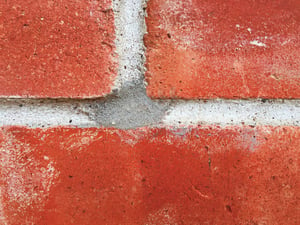
When it comes to either lap boards or cedar shake siding, sometimes the siding can be taken off and other times a crew will have to drill through it.
The condition of the wood siding really determines whether it has to be removed or not. If it is brittle, then it makes more sense to drill through it as to not break any pieces.
The process for installing injection foam after drilling through the wood siding is similar to aluminum and vinyl siding. The installer runs the hose up and down the cavity ensuring it is full.
Once the installation is done, the holes are filled with a tapered pinewood plug.
If the home has T1-11 wood siding, then it cannot be removed and the best practice is to drill through it.
Insulating Walls with Vertical Metal Siding
Vertical installed siding isn’t really meant to be removed.
When working with vertical metal siding the crew would drill a small hole around 1 ½-inches into the siding to inject the foam. After the foam has been injected into the cavities all around the home, the holes are then plugged with a 1 ½-inches plastic cap and sealed with caulk.
An experienced crew will take their time during this installation process as to not dent the siding.
Interior Wall Insulation in Home with Hardie Board Siding
The process to remove hardie board siding is much more complex than vinyl or aluminum.
The installation crew will carefully and evenly pull up the board to the exposed nail. The nail heads may need to be cut off if there is any issue removing them. Any existing caulk will also need to be removed.
Once the hardie board is removed, the injection foam is installed and the holes are plugged. Now the hardie board needs to be replaced.
Reinstalling the board is similar to vinyl or aluminum, except there are a few extra steps. If the removal went as planned and all of the nails came out in one piece, the crew can use those same holes to drive the nails through. If the nails had to be cut, then the crew will have to drill new holes.
The crew will also need to re-caulk around the siding once the project is finished.
Hardie board is a durable material, but it can still get damaged and even broken because it isn't designed to be removed.
That is why some homeowners opt to have their foam installed from the inside of their homes.
Adding Insulation Behind Drywall
 There are times when it makes more sense to install the injection foam from the inside.
There are some homeowners who prefer to install from the inside if their siding can’t be removed and they don’t want it drilled into.
When this is the case, for existing walls or the garage common wall, a 2 ½-inch hole is drilled into the wall. Much like from the outside, a crew member runs a Slim Jim up and down the cavity. The installer then injects the foam into the cavities.
Once the foam has been installed, a crew member will put a rough patch over the drilled hole, which includes mesh tape and the first coat of drywall mud. The rest of the finish is up to the homeowner.
Another instance when installation happens inside the home is if you want the concrete block walls in your basement insulated. In this case, the foam can be sprayed directly on the blocks or injected into the cores of the blocks.
Learn More about Adding Insulation to Existing Walls
Now you know all there is to know about insulating exterior walls of existing homes how we work with different siding types.
But maybe you have a couple more questions, like what happens to your old fiberglass in the walls?
I'm glad you asked!
Those fiberglass batts were probably installed in the 1970s, which means in 2020 they're likely only filling about 25 percent of the cavity.
The fiberglass can stay right where it is because the injection foam is going to compress it against the inner wall and seal around it. Now you have a full cavity and an air seal.
If you’d like to learn even more about the benefits of foam insulation in other areas of your home, check out the Learning Center on our website.
Related Articles
How Do Crews Know if the Wall Cavity is Full When Injecting Foam Insulation?
What is the Best Way to Insulate Concrete Block Walls in Homes
Installing Injectable Foam Insulation for Existing Homes from the Inside